Dental Education Lecture: How to Floss
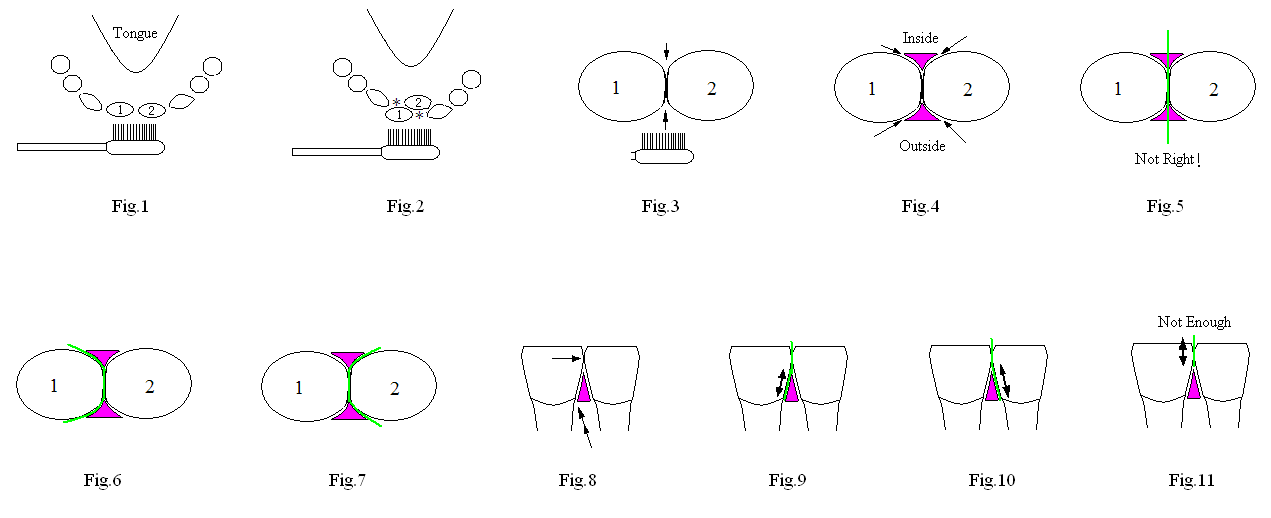
In lecture Tooth Alignment and Oral Health, we mention that good tooth alignment helps us brush (Fig.1, biting surface view of lower teeth). #1,2 represent two lower front teeth. By contrast, it is not easy to clean crowded, concave areas (* in Fig.2). Even in an excellently aligned dentition, the contact area between two neighboring teeth is not accessible to tooth brushing as illustrated in Fig. 3 (between 2 arrows). Fig.3 is magnification of the two front teeth in Fig.1. We push the two teeth more closely together to show how closely the two neighboring contact each other. To show how to floss, we need to add another important component of dental apparatus, the gums (pink areas in Fig.4). Two pieces of gum tissue (on the outside and inside of the teeth) are actually joined together. There is a small gap between the gums and tooth (indicated by arrow), which we call gum groove. The gum groove is mentioned in lecture Adult Brushing. This is an area with a lot of dirty stuff. The gum grooves indicated by arrows in Fig.4 need to be flossed. To most of laymen, dental flossing is straight up and down (green line in Fig.5). In fact, this is not good practice. It will damage your gums.

Instead we should bend floss (green line in Fig.6), pass the contact area, slide against the inner side of the tooth (#1), i.e., in the small gap (gum groove) as indicated by 2 arrows on one side of the contact area (Fig.4) and go up and down. Next, we should bend floss in the opposite direction (green line in Fig.7), pass the contact area, slide up and down against the inner side of the tooth labeled as #2. Let us change to a different view.
Fig.8 is the front view of the two lower front teeth. Single arrow points to the contact area between these two teeth. Pink area represents the gums between these two teeth. Double arrows point to the bottom of the gum groove. For the first time, dental floss should go through the contact area, slide against the inner side of the tooth (#1) and go up and down as indicated by double headed arrow in Fig.9. The whole sliding path is shown by the green line. Combined with Fig.6, you may understand better. Take out the dental floss and change to a clean segment of floss. For the second time, the floss also needs to pass the same contact area, then slide the inner side of the neighboring tooth (Fig.10: sliding path indicated by green line and double-headed arrow). Plaque and tartar are pretty tough to remove. We need to floss the area up and down for several times, e.g., five times. A common mistake is just to pass thorough the contact area (Fig.11 short green sliding path and arrow). This is not enough. For thoroughness, dental floss should go all the way down to the bottom of gum groove as indicated by the double arrow in Fig.8. Some of people are afraid that by going too deep floss may hurt the gums. If you floss very skillfully and gently as described above, your gums will be kept healthy. If you do not floss, food debris and germs are deposited along the tooth surfaces next to the gum groove. The deposit will cause cavities and gum diseases, Next lecture will further demonstrate how to floss and when.
Xin Wei, DDS, PhD, MS first edition 03/20/2010, last revision 01/10/2011